
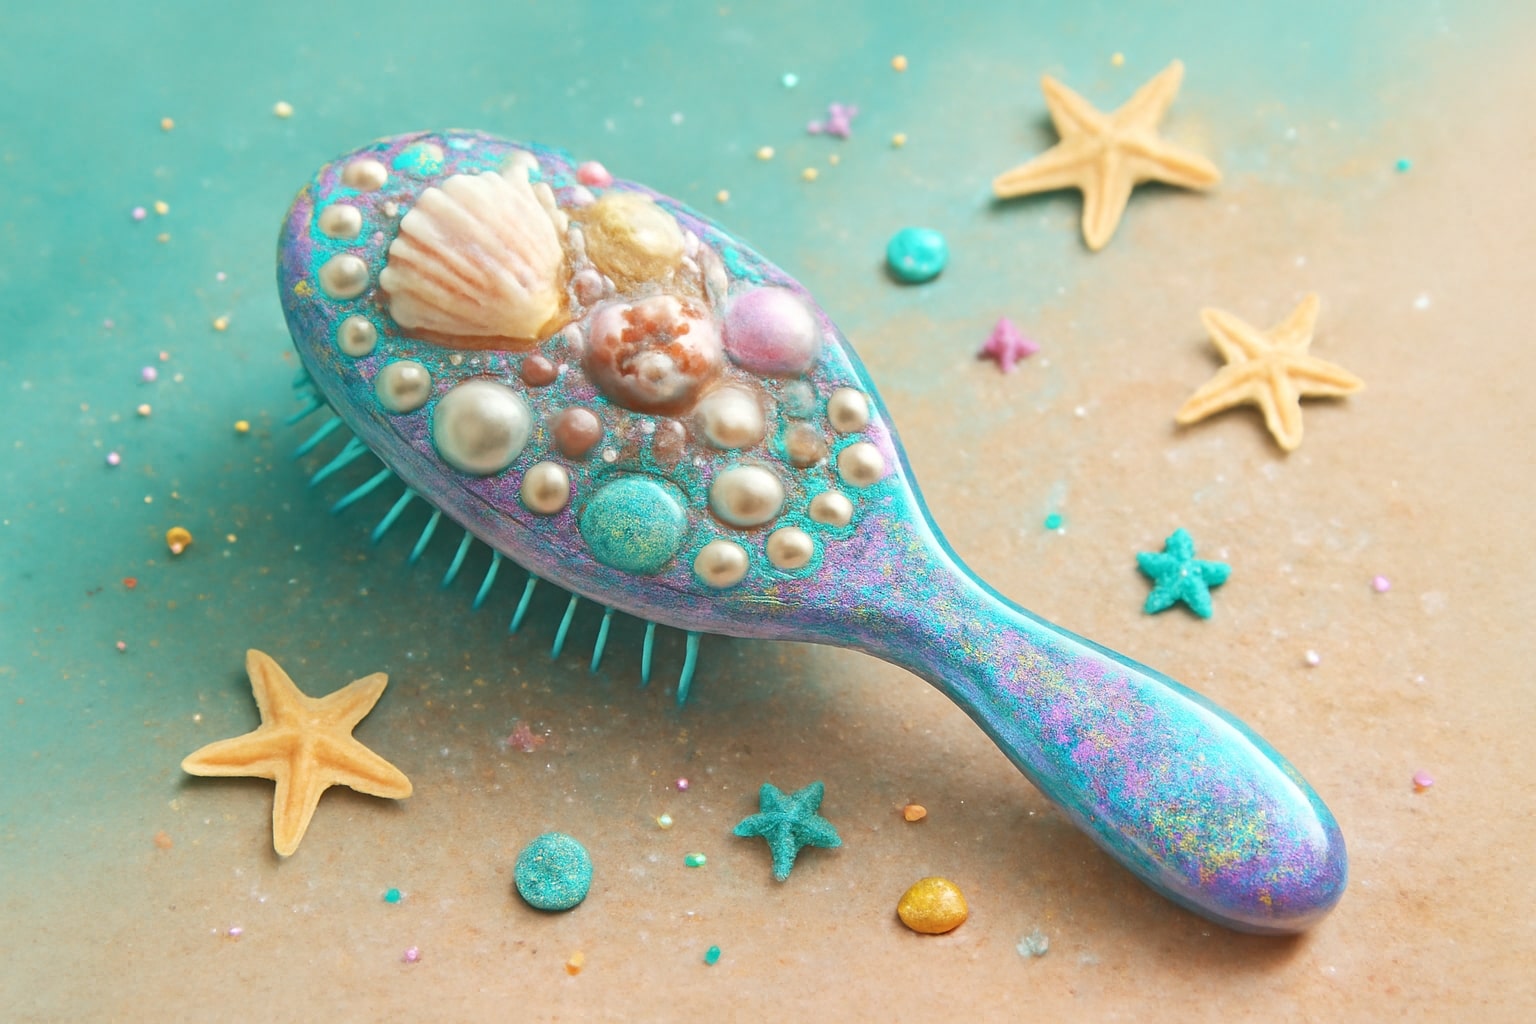
DIY Mermaid Hairbrush with Shells & Pearls – Tutorial
If you’ve ever found yourself staring at a boring plastic hairbrush and thinking, “This could be so much cuter,” you’re not alone. The mermaid aesthetic is all about embracing magic, fantasy, and the deep-sea shimmer of shells and pearls—and this DIY tutorial is your golden ticket to creating a brush that looks like it washed up from Atlantis.
Whether you’re prepping for a costume party, planning a themed gift, or just want your everyday tools to reflect your inner ocean goddess, a custom mermaid hairbrush is the kind of craft project that’s both wildly fun and seriously satisfying.
You don’t need fancy tools. You don’t need to be an expert crafter. All you need is some imagination, a few well-placed shells, a bit of sparkle, and a free afternoon.
By the time you’re done, you won’t just have a brush—you’ll have a mini work of art that brings beachy magic to your vanity, your gift basket, or your everyday routine.
Let’s get started 🐚✨
Why Make a Custom Mermaid Hairbrush?
There’s something really special about using something you’ve made yourself. It holds a different kind of value—especially when it’s as beautiful as it is useful.
A mermaid hairbrush isn’t just about aesthetics (although let’s be honest, it’s going to be stunning). It’s also a creative expression. It’s your own take on ocean-core vibes, brought to life with shimmer, shells, and DIY magic.
🌟 Here’s why you’ll love making one:
-
Personalization: No two mermaid brushes will ever look the same. You get to design every inch to match your style or the person you’re gifting it to.
-
Function meets fantasy: It’s still a real brush! But now it’s got a personality.
-
Perfect for themed gifting: Add it to a birthday box, bridal set, or sleepover kit and instantly become the “that friend” who gives memorable gifts.
-
Cosplay or costume-friendly: Headed to a mermaid-themed party or event? This brush doubles as a prop.
-
A fun bonding craft: It’s the perfect weekend activity for besties, kids, or even a solo chill day.
It’s more than just glue and glitter—it’s the kind of small project that brings joy every time you use it. And trust me, brushing your hair feels a lot more magical when your brush looks like it came from a secret treasure chest under the sea.
Materials You’ll Need
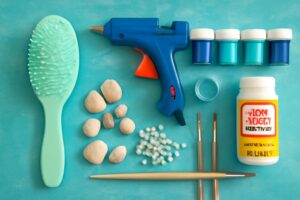
Before you dive into this ocean of creativity, let’s make sure you’ve got your supplies ready. Don’t stress—you can find most of these at your local craft store, dollar store, or even online. Some might already be sitting in your drawers!
🧰 Essentials:
-
Hairbrush – Paddle brushes or detanglers work best
-
Hot glue gun – Strong and quick-drying
-
Shells – Real or faux (craft-friendly and smooth)
-
Faux pearls – Flat-back or round
-
Glitter – Iridescent, chunky, or fine (optional but fabulous)
-
Acrylic paint – Metallic shades like teal, purple, silver
-
Paintbrushes – Small detail brushes or foam applicators
-
Mod Podge or spray sealant – To protect your design
🌟 Optional Embellishments:
-
Rhinestones or gems – For extra sparkle
-
Mini mermaid charms or starfish pieces
-
Metallic foil flakes or holographic stickers
-
Ribbon, netting, or lace for texture
🔍 Where to Shop:
-
Dollar stores – great for brushes, glitter, and pearls
-
Craft stores (Michaels, Hobby Lobby) – shells, charms, paint
-
Online (Amazon, Etsy) – wide selection + unique finds
-
Beach trips or souvenir shops – for natural shells (clean thoroughly)
💡 Pro Tip: Choose materials that are lightweight and flat-backed where possible. You want your design to be beautiful, but still comfortable to hold and use.
Choosing the Right Brush as a Base
Let’s talk foundation—because your hairbrush base matters. This is the canvas for your underwater masterpiece, and not all brushes are created equal when it comes to crafting.
🪞 Best Brush Types for DIY Mermaid Makeover:
-
Paddle Brushes (flat back)
-
Ideal surface for gluing and painting
-
Usually comes in plastic or wood
-
Great for display or regular use
-
-
Detangler Brushes (like Wet Brush)
-
Still flat, but curved slightly
-
More ergonomic, lightweight
-
Easier to hold if you’ll be using it daily
-
-
Mini Travel Brushes
-
Adorable for gifting or adding to small vanity kits
-
Portable, great for kids or beach bags
-
🎨 Things to Consider:
-
Material: Plastic is easiest to paint and glue on. Wood can work too, but may need sanding and sealing.
-
Color: Lighter brushes are easier to paint over. Or choose a sea-inspired base like pastel pink, mint, or lavender to match the theme.
-
Surface texture: Avoid brushes with heavy bumps, grooves, or patterns on the back—smooth = easier design work.
🧜♀️ Choose something that feels good in your hand and fun to transform. You’re not just decorating—you’re upgrading something basic into something beautiful.
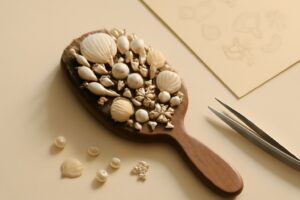
Collecting Shells and Decorative Pieces
Here’s where the magic really begins. Your shells, pearls, and tiny treasures are what will turn your plain hairbrush into a sparkling mermaid relic.
🐚 Where to Find Shells:
-
Craft stores (pre-cleaned, pre-polished)
-
Online (Amazon has huge mixed bags)
-
Beachcombing (wash & dry well before use)
👉 Real vs Faux Shells?
-
Real shells have authentic texture but may be heavier or harder to glue
-
Faux shells (resin or plastic) are lighter, smoother, and often flat-backed—ideal for crafting
💎 Pearls & More:
-
Flat-back pearls are easiest to work with
-
Use different sizes to add visual interest
-
Combine with tiny rhinestones or gems for layered sparkle
✨ Other Fun Add-Ons:
-
Iridescent glitter or foil
-
Mermaid scales (use holographic washi tape!)
-
Tiny sea creature charms (seahorses, fish, turtles)
This is where your personality comes in—go minimal or go full Ariel, it’s totally up to you.
Prepping Your Hairbrush
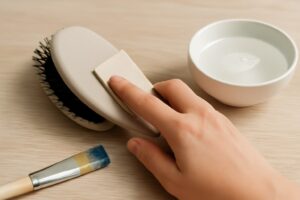
Before you dive into glitter and glue, your brush needs a little TLC. Prepping it properly will help everything stick better and last longer—trust me, this step makes a huge difference.
🧼 Step 1: Clean the Surface
Even brand-new brushes can have oils, dust, or a factory finish that repels paint and glue. Here’s how to prep:
-
Wipe the brush surface with a damp cloth and mild soap
-
Let it dry completely
-
Use a little rubbing alcohol for final cleaning (especially for plastic)
🪵 Step 2: Sand Lightly (Optional)
If your brush has a shiny or glossy back, lightly sand it with fine-grit sandpaper to give the glue and paint something to grip. Don’t overdo it—just a gentle pass will do.
🎨 Step 3: Prime or Paint Base (Optional)
Want a background color before adding shells and glitter?
-
Use acrylic paint in light teal, lavender, silver, or metallic pink
-
Apply 1–2 thin coats with a foam brush or sponge
-
Let dry fully between coats
-
Seal with Mod Podge or matte spray if you’re stopping at paint
💡 Pro Tip: If you’re doing a glitter base, mix glitter + Mod Podge and brush it on like paint—it dries clear and sparkly!
Layout Planning Before Gluing
You’ve got your brush, you’ve got your ocean treasures… now don’t just start gluing randomly. A little planning will help your design look polished instead of chaotic.
🖼️ Step 1: Test Your Layout
Place your shells, pearls, and other pieces on the brush without glue. Try different combinations:
-
Do you want a full-coverage look? Or just the top edge decorated?
-
Do you prefer symmetry (balanced left to right) or an organic cluster?
-
Want to highlight one large shell or charm in the center?
Try snapping a photo of your dry layout to use as a reference later.
💎 Step 2: Layering for Dimension
Think in layers:
-
Base layer = paint or glitter background
-
Mid layer = larger shells, flat pieces
-
Top layer = pearls, gems, details
Use odd numbers of grouped items (3, 5, 7) for a natural, artistic flow.
🧜♀️ Mermaid Vibe Tip: Start with the largest shell at the top center and flow downward like a cascade of undersea treasures.
Gluing the Shells and Pearls
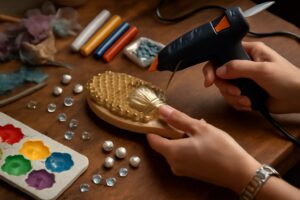
Now comes the most satisfying part: locking in your design.
🔥 Best Glue Options:
-
Hot glue gun: Fast-drying and easy to control
-
E6000: Industrial strength, waterproof, better for humid bathrooms
-
Epoxy resin: Super durable, but messier and longer to cure
Hot glue is perfect for this project if you’re not storing the brush in water or steam daily.
🧲 Gluing Tips:
-
Apply glue on the back of the shell, not the brush—prevents overflow
-
Hold each piece down for 10–15 seconds before letting go
-
Use tweezers or craft sticks for small pearls or gems
-
Wipe stray glue strings with a dry toothpick before they harden
🚫 What to Avoid:
-
Too much glue = mess and bubbles
-
Stacking heavy shells without support
-
Ignoring dry time between layers (your pieces may slide)
Take your time—it’s not a race. Let your mermaid muse guide your hands.
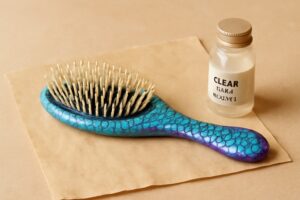
Adding Paints, Glitter, and Final Touches
This is where your brush turns into a full-blown mermaid masterpiece. Once everything is glued down and dry, now you can add shimmer, shadow, and sparkle.
🎨 Paint Accents:
-
Use metallic acrylic paint to lightly brush over shells for shine
-
Add a bit of white paint to edges for a “sunlight shimmer” effect
-
Blend multiple shades (blue to green) for a gradient wave look
Use a dry brushing technique: Dip the brush in paint, blot on a paper towel, then gently sweep over textured surfaces.
✨ Glitter Time:
-
Mix glitter with Mod Podge and brush around edges
-
Or sprinkle over wet glue for a raw sparkle
Make sure to keep glitter away from bristles and working parts of the brush.
🧿 Final Touches:
-
Add tiny gems to fill any gaps
-
Stick on a flat-back charm (mermaid tail, starfish, initial letter)
-
Paint the brush handle with matching color or glitter wrap
💡 Optional: Use UV resin over top for a glassy, sealed finish (next level pro tip if you’re gifting or selling).
Drying and Curing Time
After all your hard work, the worst thing you can do is rush this step. Let your creation fully cure so it doesn’t smudge, slide, or get ruined.
⏱ Dry Time Guidelines:
-
Hot glue: Safe to touch in 10–15 minutes, fully cured in 1 hour
-
Paint or Mod Podge layers: At least 1–2 hours between coats
-
E6000 or resin: Allow up to 24–48 hours to fully set
Place your brush flat on a clean surface, in a well-ventilated, dust-free area.
🛑 Don’t use or display the brush until it’s completely dry—you’ve put too much love into it to risk damage.
Sealing and Protecting Your Design
You’ve painted, glued, glittered, and styled — now it’s time to make sure your beautiful brush lasts. Especially if it’s going to live in your bathroom, vanity, or travel bag.
Sealing helps your decorations:
-
Stay firmly attached
-
Resist water, humidity, or wear
-
Keep paint from chipping or glitter from flaking
🛡 Best Sealing Options:
-
Mod Podge (Gloss or Outdoor formula)
-
Easy to brush on
-
Dries clear with a soft shine
-
Great for everyday use
-
-
Clear Acrylic Spray
-
Quick-drying
-
Provides even coat and water resistance
-
Best used in open, ventilated space
-
-
UV Resin Coating (Advanced)
-
Gives a thick, glassy shine
-
Hard finish like enamel
-
Requires a UV lamp to cure (perfect for selling crafts)
-
💡 How to Seal:
-
Make sure your brush is completely dry
-
Use a soft brush or sponge to apply thin layers of sealant
-
Avoid brushing too hard over glued pieces
-
Let it dry for 12–24 hours depending on product
🧜 Pro Tip: Reapply sealant every few months if the brush is stored in humid areas.
Styling Ideas for Display or Gifting
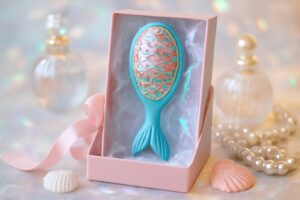
Your brush is now an underwater fantasy—so how you present it matters just as much!
🎁 Gifting Ideas:
-
Place the brush in a clear gift bag with shimmery paper
-
Add extras like a mermaid-themed scrunchie, comb, or bath bomb
-
Create a full “Mermaid Glam Kit” for birthdays or girls’ night boxes
🪞 Display Ideas:
-
Stand upright on your vanity in a clear acrylic holder
-
Lay flat on a decorative tray with seashells or crystals
-
Hang on a hook with ribbons or pearl chains
This brush isn’t just a tool—it’s a vibe. Whether it’s on display or wrapped for someone special, it deserves to be shown off like the tiny treasure it is.
Variations: Ocean, Fairy, and Fantasy Versions
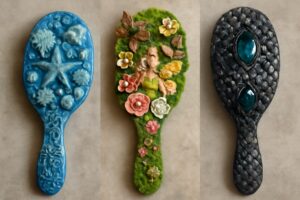
Mermaid isn’t the only theme this idea can take. Once you get the basics down, you can easily remix this DIY into different aesthetics.
🌊 Oceanic:
-
Blue + silver tones
-
Starfish, sand dollars, and tiny rope details
-
Natural shell textures and netting
🧚 Fairy-Inspired:
-
Pastel pinks and greens
-
Faux flowers, moss, butterfly wings
-
Add shimmer with mica flakes or metallic paint
🐉 Fantasy Warrior:
-
Dark green, bronze, or obsidian palette
-
Dragon scale textures, chainmail beads
-
Matte sealant for a more rugged look
Once you master one brush, it becomes a whole creative outlet. You could even make matching mirror compacts, combs, or hair accessories for a full theme!
Mistakes to Avoid
Crafts are all fun and glitter until something slides off or your brush ends up looking like a kindergarten volcano project. 😅 Here’s what to watch out for:
❌ Over-gluing
Too much glue creates lumps, leaks, and can damage shells.
✅ Apply in small dabs and press gently.
❌ Rushing the Dry Time
You’ll ruin hours of work just by using it too soon.
✅ Give it full cure time, especially if sealing.
❌ Uneven Layout
If you glue without planning, the result can feel heavy or unbalanced.
✅ Arrange first, take a photo, then glue one by one.
❌ Forgetting Brush Functionality
Decorating too close to bristles or handle grip can make it uncomfortable or unusable.
✅ Keep art to the back and edges of the brush head.
Mistakes are part of learning, but these tips will save your time—and your design!
Conclusion
You did it—you transformed an everyday brush into a dreamy, sparkling treasure straight out of mermaid lore. 🐚✨
And more than that? You gave yourself space to create. In a world of mass-produced everything, there’s real magic in taking something simple and turning it into something uniquely yours.
Whether you made this for yourself, as a gift, or to start your own custom craft shop—this project proves you don’t need a studio or a degree to make beauty happen. All you need is a vision, some shells, a little glue, and the courage to try.
So the next time you reach for your mermaid hairbrush, remember—you made that. With your hands, your style, and your inner sparkle.
Now go out there and brush like a sea goddess. 🧜♀️🌊
FAQs
Q1: Can I actually use the brush after decorating it?
Yes! Just avoid decorating too close to the bristles or grip. Sealing it well also helps protect the design from daily use.
Q2: Is this a safe craft for kids?
Absolutely—with adult supervision. Use non-toxic glue and keep hot tools away from little hands. It’s a great party activity for older kids.
Q3: How do I clean the brush once it’s decorated?
Wipe it gently with a damp cloth. Avoid soaking it or scrubbing hard near glued decorations.
Q4: Will the decorations fall off in a humid bathroom?
If sealed well with Mod Podge or acrylic spray, it’ll hold up fine. For extra durability, keep it stored in a dry drawer or vanity box.
Q5: Can I sell these brushes on Etsy or at craft fairs?
Yes! They’re unique, affordable to make, and super popular with fantasy fans. Just test your sealants and offer gift-ready packaging.